Tasks
The Tasks tab is only relevant and visible for requests where your organization is responsible for annotation production and/or review of the annotations.
When should I visit the Tasks tab?
It is in the Tasks tab that you view and manage tasks created within a request. Here you can assign specific tasks to workforce members, view individual tasks, and expand the task chain for specific inputs, among other functions.
You can find frequently asked questions related to Tasks in the section below.

What is a task?
A task connects an input to a workforce member and defines what action they should perform with that input. As an input progresses from its original state to a delivery-ready (or final) annotation within the request, it can generate one or multiple tasks, sometimes even multiple tasks of the same type. The number of tasks is determined by the workflow used in the request and whether tasks expire and get reassigned to new users.
There currently exist four types of tasks: Annotate, Correct, Review, and Review Correct.
Task Type | Description |
|---|---|
Annotate | A task where you should annotate from scratch, i.e. you start with an empty task and fill it with annotations based on the provided guideline. |
Correct | A regular correction task, where you should go through and correct the full task.Β |
Review Correct | A correction task where you should improve the annotation based on correction requests and feedback. Review corrections are created when a reviewer rejects the quality of an annotation. |
Review | A task in which a Quality Expert is asked to determine if the annotation is of acceptable or unacceptable quality. If the task quality is unacceptable the expert also provides correction requests and feedback, which is presented in a review correction. |
ο»Ώ
Viewing tasks
Open the task tab within your selected request.
Locate the task you want to view.
Open the task's options menu by clicking the three dots to the right of the task's table row.
Click the "View in task view" menu option.
The task is now open in a new tab. π΅π»ββοΈ
ο»Ώ
Finding tasks
Open the task tab within your selected request.
Click the advanced filter "Create assignment filter" to create an assignment filter.
In the top field, select the "Assigned to a specific workforce member" filter type.
In the bottom field, search for the workforce member whose tasks you want to find.
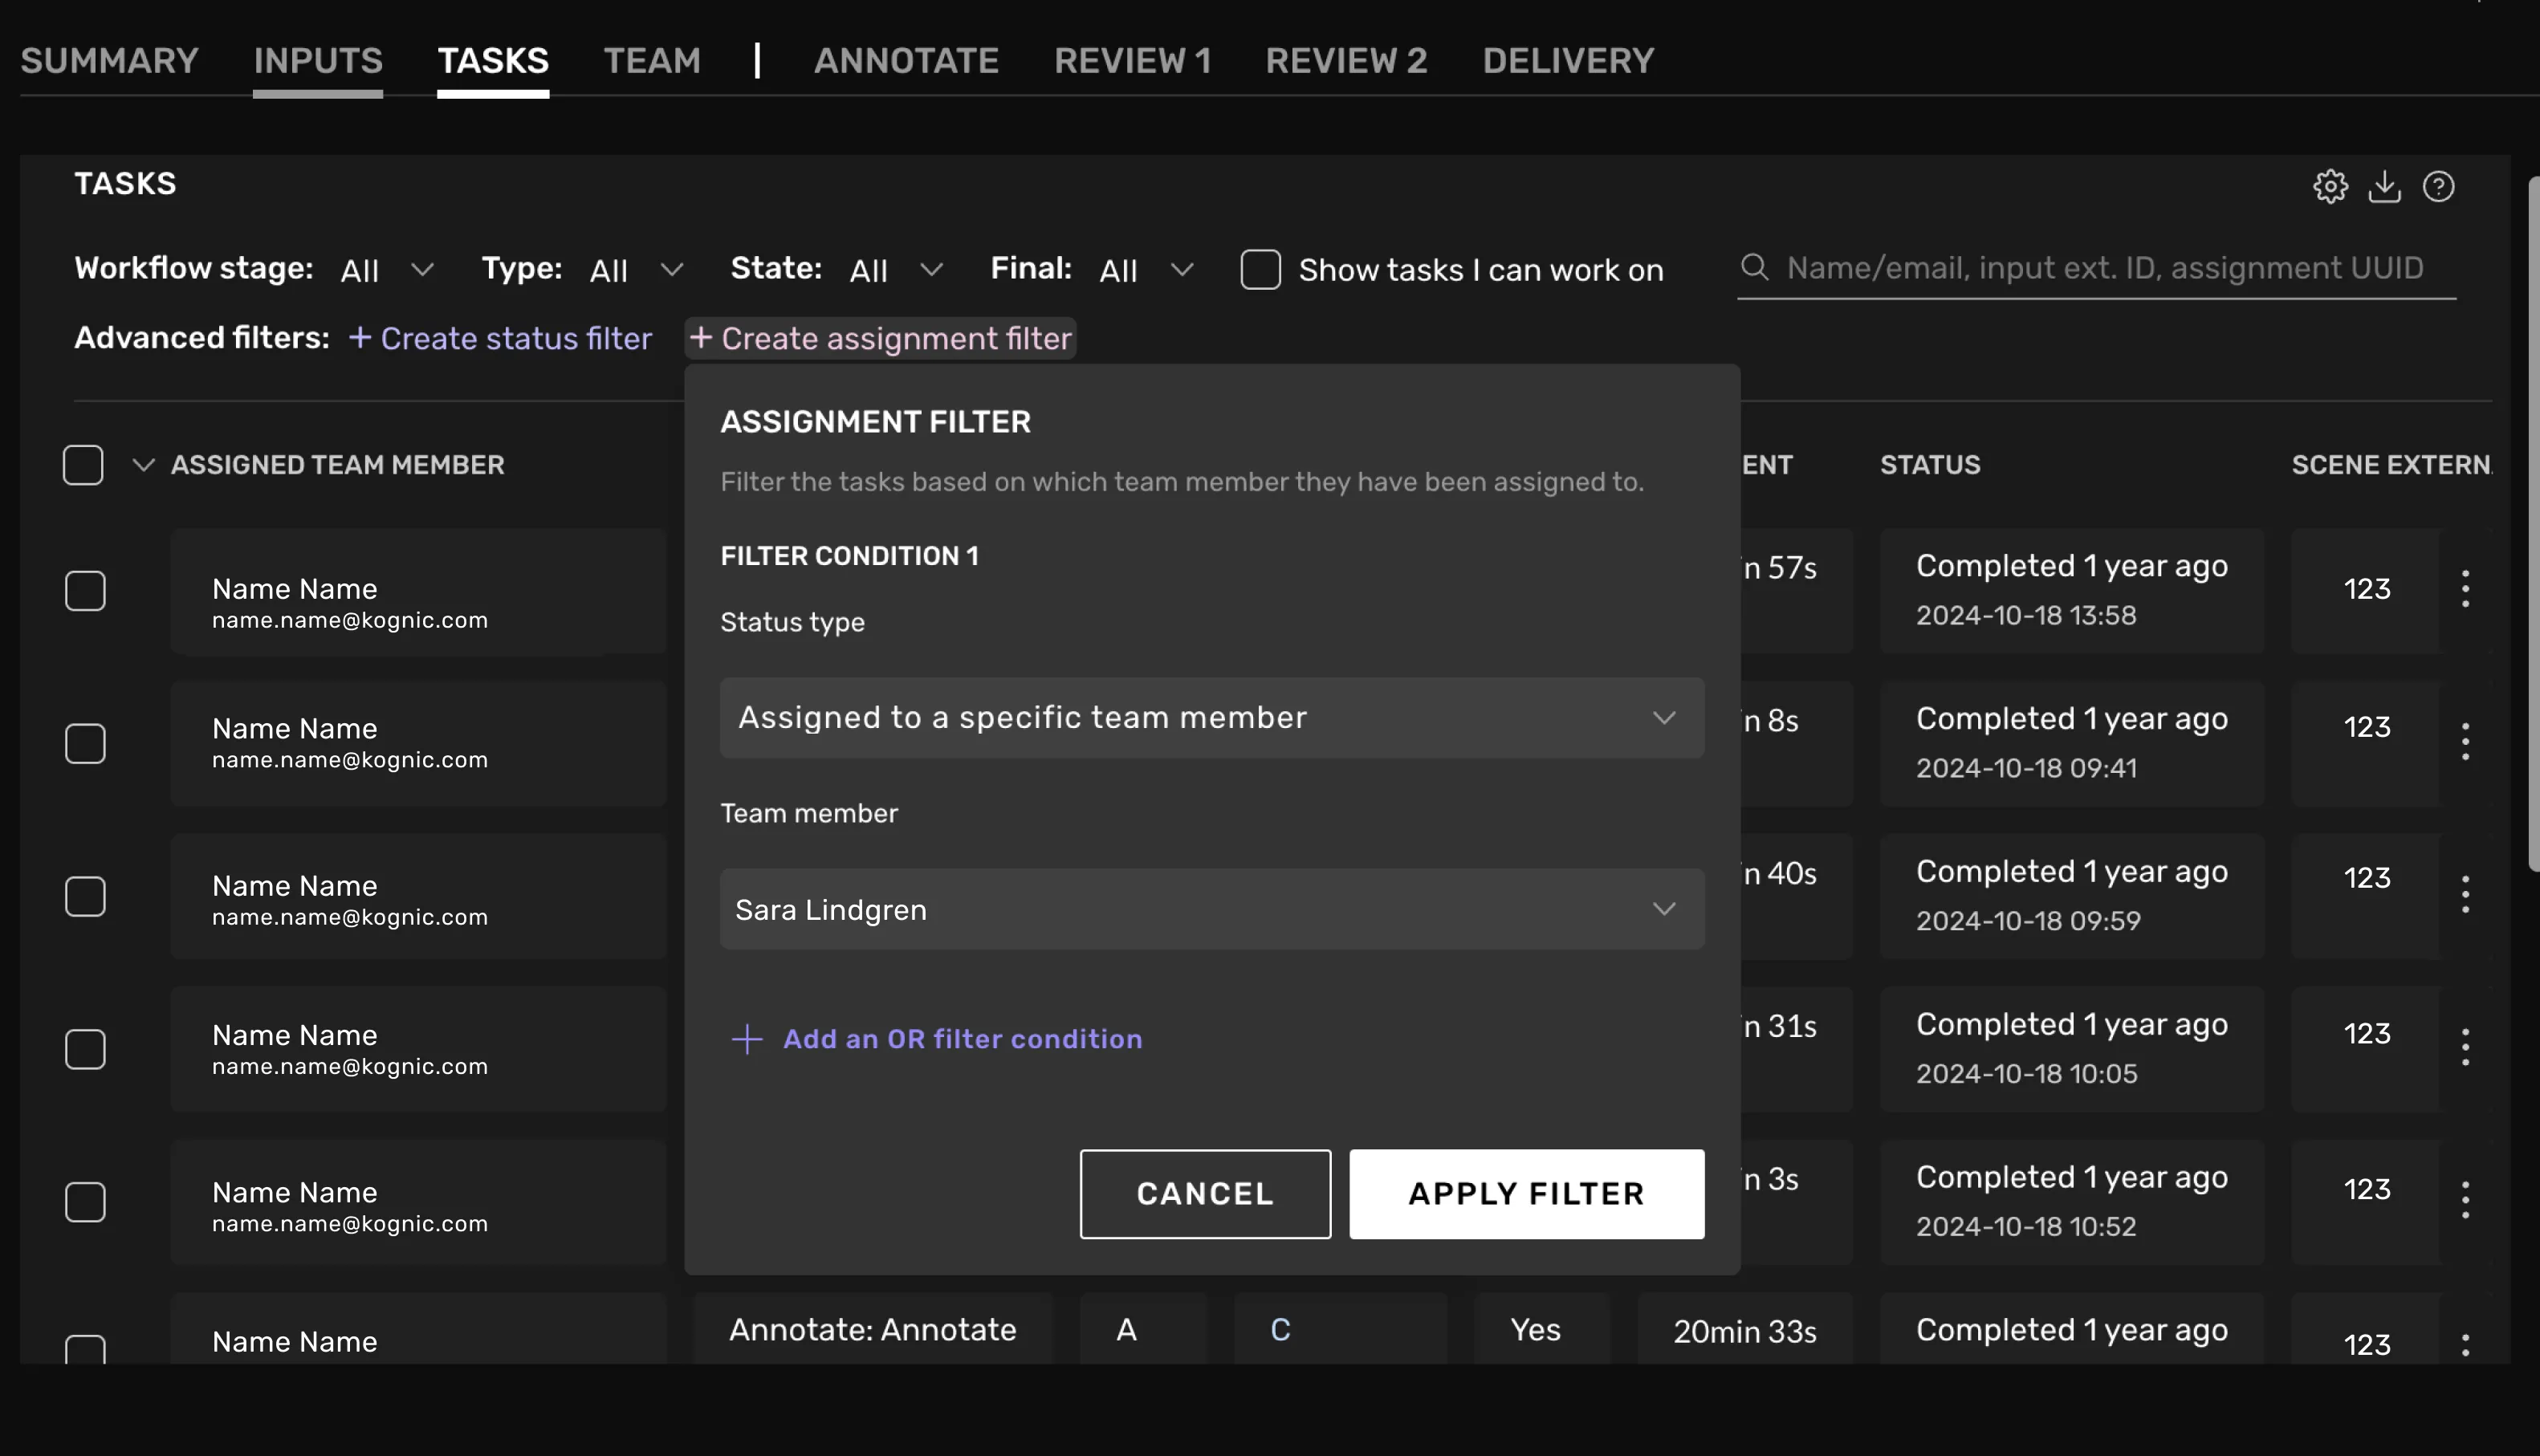
Click "Apply filter" and the table should now only show tasks assigned to the workforce member in question.
If you want to filter the tasks further, you can use the search bar or the following filters:
Workflow stage: Filters the tasks based on the workflow stage they were created in.
Type: Allows you to filter among tasks of different types, i.e. Annotate, Correct, Review, and Review Correct tasks.
State: Filters the tasks based on their progress.
State | Abbreviation | Description |
|---|---|---|
To Do | T | The task hasn't been started. |
Ongoing | O | The task has been started, and is not yet completed or expired. |
Completed | C | The task has been submitted and is considered completed. |
Paused | P | The task has been paused. |
Expired | E | The task has expired. |
Final: Find tasks which either became the final delivery-ready annotation (Final = Yes), or didn't (Final = No).
Status (Advanced filter): Filter the tasks based on their status and status context. Such as Task Assigned < 1 day ago.
Each scene/file within the request is represented by a request input. This input moves through the request's workflow and, once completed, is populated with a delivery-ready annotation.
Locate either the Scene External ID or the Scene UUID for the input you want to find. Copy it π
Open the task tab within your selected request.
Paste the ID inside the search bar located at the top right corner of the Tasks table.
All tasks matching this specific ID should now be visible in the table.
The search function displays all tasks with values that fully or partially match your query. For example, if you search for ID "1234," results will include tasks with IDs like "012345" and "1234658".
Assigning tasks
Generally, tasks are assigned automatically within a request, provided that workforce members have been added and automatic task allocationautomatic task allocation has been activated.
If you want to manually assign a specific task to a particular workforce member, you can do so in different ways, depending on the Task's state.
Assign a task that hasn't been assigned yet
If the task is in the 'To Do' state and hasn't been assigned to a specific workforce member, you can use the 'Assign' action. You can use it in the following ways.
Assigning a single task
Open the task tab within your selected request.
Locate the task you want to assign, and make sure it has the state To Do and hasn't been assigned to any workforce member yet.
Open the task's options menu by clicking the three dots to the right of the task's table row.
Click the "Assign..." menu option.
Select the workforce member you want to assign the task to.
Confirm by clicking the "Assign task" button, and the task will be assigned to the selected workforce member. π
Assigning multiple tasks to the same workforce member
Open the task tab within your selected request.
Select all tasks you want to assign by clicking the checkbox to the left of each task's row.
An action bar will now appear at the bottom of the page. Click the option "Assign".
Select the workforce member you want to assign the tasks to.
Confirm by clicking the "Assign task" button, and the tasks will be assigned to the selected workforce member. π
Reassign a task that is already assigned or even ongoing
If a task has been assigned or even started, you can't use the assign action described above. Instead, you will have to use the "Reassign" action.
Reassigning will expire the current task and create a new one for the selected inputs. The workforce member who is currently assigned this task will lose access, and the workforce member you select will be assigned the new task instead.
All completed work will be carried over to the new task, and the newly assigned workforce member can continue where the previous workforce member left off.
When reassigning tasks that contain progress (task with the state Ongoing), existing objects, shapes, and properties are duplicated into the new assigneesβ tasks. The original assignees keep their collected annotation points, but the new assignees may appear more productive since they also get points for the previous work.
Reassigning a single task
Open the task tab within your selected request.
Locate the task you want to assign.
Open the task's options menu by clicking the three dots to the right of the task's table row.
Click the "Reassign..." menu option.
Select the workforce member you want to reassign the task to.
Click "Reassign" to confirm. This will create a new task for your selected workforce member with all the progress from the expired task.
Assigning multiple tasks to the same workforce member
Open the task tab within your selected request.
Select all tasks you want to assign by clicking the checkbox to the left of each task's row.
An action bar will now appear at the bottom of the page. Click the option "Reassign".
Select the workforce member you want to reassign the tasks to.
Click "Reassign" to confirm. This will create new tasks for your selected workforce member with all the progress from the expired tasks.
If a task has been assigned or even started, you can't use the assign action described above. Instead, you will have to use the "Reassign" action.
Reassigning will expire the current task and create a new one for the selected inputs. The workforce member who is currently assigned this task will lose access, and the workforce member you select will be assigned the new task instead.
All completed work will be carried over to the new task, and the newly assigned workforce member can continue where the previous workforce member left off.
When reassigning tasks that contain progress (task with the state Ongoing), existing objects, shapes, and properties are duplicated into the new assigneesβ tasks. The original assignees keep their collected annotation points, but the new assignees may appear more productive since they also get points for the previous work.
Reassigning a single task
Open the task tab within your selected request.
Locate the task you want to reassign.
Open the task's options menu by clicking the three dots to the right of the task's table row.
Click the "Reassign..." menu option.
Select the workforce member you want to reassign the task to.
Click "Reassign" to confirm. This will create a new task for your selected workforce member with all the progress from the expired task.
Reassigning multiple tasks to the same workforce member
Open the task tab within your selected request.
Select all tasks you want to reassign by clicking the checkbox to the left of each task's row.
An action bar will now appear at the bottom of the page. Click the option "Reassign".
Select the workforce member you want to reassign the tasks to.
Click "Reassign" to confirm. This will create new tasks for your selected workforce member with all the progress from the expired tasks.
ο»Ώ
You can expire a task if you want it automatically reassigned from one workforce member to another. This is especially useful when some workforce members have completed all their work while others have unstarted assigned tasks that could be redistributed to those without work.
Expiring a single task
Open the task tab within your selected request.
Locate the task you want to expire. Ideally, it should be in the 'To Do' state since you lose started work by expiring, but the option is also available for ongoing tasks.
If you expire an ongoing task, all progress made inside the task will be lost. Consider using the reassign action to combat this limitation. It is described under the question "How do I reassign a task that has already been started and contains progress?" above.
Open the task's options menu by clicking the three dots to the right of the task's table row.
Click the "Expire" menu option.
Click the "Expire" button to confirm. This will expire the task and make a new task available for automatic allocation. The new task will have the same initial state as the expired one.
Expiring multiple tasks
Open the task tab within your selected request.
Select all tasks you want to expire by clicking the checkbox to the left of each task's row. Ideally, the tasks should be in the 'To Do' state, as you lose started work by expiring; however, the option is also available for ongoing tasks.
If you expire an ongoing task, all progress made inside the task will be lost. Consider using the reassign action to combat this limitation. It is described under the question "How do I reassign a task that has already been started and contains progress?" above.
An action bar will now appear at the bottom of the page. Click the option "Expire".
Click "Expire" to confirm. This will expire the tasks and make new tasks available for automatic allocation. The new tasks will have the same initial state as the expired ones.
Other questions
Open the task tab within your selected request. In the table, each row represents a task. The Assigned workforce member column shows who is responsible for each task. If a task hasn't been assigned yet, you'll see "No workforce member assigned" instead of a name.