Annotation Points and Target
Knowing how much data is being produced, and how productive annotators are, are important measures for running a project. There are several metrics which are common in the industry, such as number of shapes or objects, the amount of properties set or tasks completed. To normalize these measures across different projects and taxonomies Kognic has developed a suite of productivity tools. The basis for these tools is the Annotation Points Specification and the Annotation Points Target.
Finding The Configuration Menu
To setup Annotation Points and targets visit Project Settings, found under Project Management.

From there you should be able to see the Annotation Points Tab. Select it and now you're able to use the Annotation Points Configuration.

Connection with the Annotation Instruction
To be able to use the Annotation Points Configuration, you need to have configured an Annotation Instruction for the project.
The Annotation Points configuration uses all the Annotation Instruction revisions that have been made during the project's lifecycle. That means that you might see fields that don't exist within the currently used Annotation Instruction. This is perfectly fine, and to be expected.
An AI allows for possibly multiple of the same geometries. If you’ve configured an Annotation Instruction to use both 2D semantic Segmentation, and 2D instance Segmentation without having Allow Instances with multiple polygons checked. Then both of these will be merged into 2D Segmentation.
Annotation Points Specification
Each article that can be created in the Kognic platform can be given an amount of Annotation Points that will be awarded the annotator adding them in a task. These articles can be things like completing the task, finishing an object or setting properties.
Below is an example of how a specification is applied to some annotator work to amount to a number of annotation points:
Specification:
Task: 10p Cuboid object: 4p 2D Bounding box object: 2p
Task content:
Cuboid objects: 10 2D Bounding box objects: 7
Annotation Points = 10p * 1 + 4p * 10 + 2p * 7 = 10 + 40 + 14 = 64p
Annotation Points Target
To measure how productive an annotator is there needs to be a target which they are expected to reach. The unit is Annotation Points per hour.
Configuration
The configuration allows for you to set the following values which then make up an entire Annotation Points Specification.
Annotation Point Target:
This is the total value of expected Annotation Points that the Annotators are supposed to be meeting every hour.

Points Per Task:
This is how many Annotation Points a task should be given to the annotators upon submission of the task.

Points Per Geometry:
This is where you’re able to configure how many Annotation Points that should be rewarded for a specific Geometry. The fields that you’re able to set the values for are:
Base Points per object - This is how many points an object should be rewarded
Additional Points per shape - How many points should be awarded per shape. (Object * Frames that the object lives in)

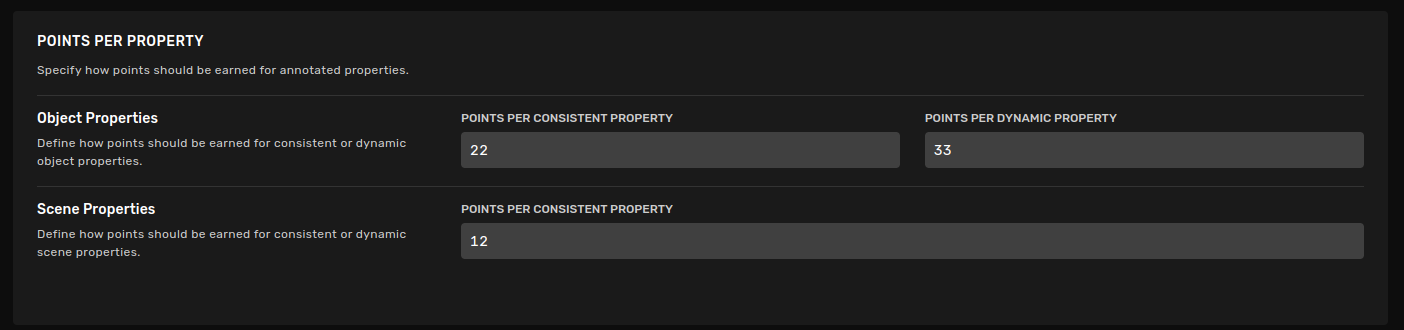
Points Per Property:
You’re able to configure Points Per Property for the Object Properties or Scene Properties that exist within the AI. The values for Dynamic properties are those that may change over time such as `Occlusion`, whereas Consistent properties are those that are consistent such as Car.
Review Point Target:
Similar to the Annotation Points Target, this setting defines the expected productivity for reviewers. The unit is Reviewed Annotation Points per Hour.
Setting this target allows the system to calculate a Review Budget (in hours) for every task. This provides reviewers with a clear time expectation based on the complexity of the annotation work.

Review Budget Calculation:
\text{Review Budget (hours)} = \frac{\text{Total Task Annotation Points}}{\text{Review Target (AP/hour)}}Example:
- Task Value: 2000 Annotation Points
- Review Target: 1000 AP/hour
- Result: The reviewer has a 2-hour budget to review the task.
Review 1 Only: Time budgets are calculated for the first review round only (Review 2+ are excluded).
Expected Learning Curve
The expected learning curve defines the speed ramp-up you expect from new annotators during their first weeks in a project. It appears as a shaded band on the Learning Curve metrics chart, giving project managers a visual reference for whether annotators are onboarding on track.
This section is only available when an annotation points target has been configured.
Configuration
Each row represents one onboarding week (starting from Week 0) and specifies a min and max value as a percentage of the annotation speed target:
- Min — the lower bound of expected speed for that week.
- Max — the upper bound of expected speed for that week.
For example, if the annotation speed target is 100 AP/hour and Week 1 is configured as 40%–60%, the expected speed range for that week is 40–60 AP/hour.
You can add up to 7 weeks (W0–W6). The last defined week's values automatically extend to fill any remaining weeks beyond the configured range.
Saving
Click Save learning curve to persist the configuration. Changes are reflected immediately on the Learning Curve metrics tab.